Homemade Hibachi Chicken & Vegetables
This homemade hibachi chicken with vegetables feels like you’re eating out from the comfort of your own home! It’s also made with the signature mustard sauce.

There’s something so fun and special about going out to dinner at a Hibachi grill! I used to work a Japanese steakhouse as a server in college and I loved the food so much. I watched this exact meal being made hundreds of times and am excited to share my take on it. Typically, this is recipe is made on a large hibachi grill, and is cooked in vegetable oil, butter, soy sauce, and served with a side of a creamy mustard sauce.
Once I went gluten-free and soy-free, I never thought I’d be able to have this meal again. I finally decided to try it at home, and I promise it tastes like the real deal and is fairly low effort! This meal is paleo, whole30, gluten-free, and can be made AIP.
Table of contents
- Why You’ll Love The Homemade Hibachi Chicken & Vegetables
- Recipe Ingredients
- What seasoning do they use for hibachi?
- What gives hibachi its signature flavor? Is there a secret ingredient?
- How to Make Homemade Hibachi Chicken
- Michelle’s Tips & Tricks 🤓
- How to make Hibachi Chicken on the Blackstone Grill
- Optional sides
- More Gluten Free Asian Inspired Recipes to Try
Why You’ll Love The Homemade Hibachi Chicken & Vegetables
- Nostalgia! Hibachi grills bring back so many memories of the food and experience, and this recipe brings those feelings without leaving your home.
- Allergen friendly! While Japanese steakhouses can be delicious, they are not friendly to allergens. This recipe is gluten-free, soy-free, as well as paleo, Whole30, and can be made AIP.
Recipe Ingredients
See the recipe card below for full information on ingredients and quantities.
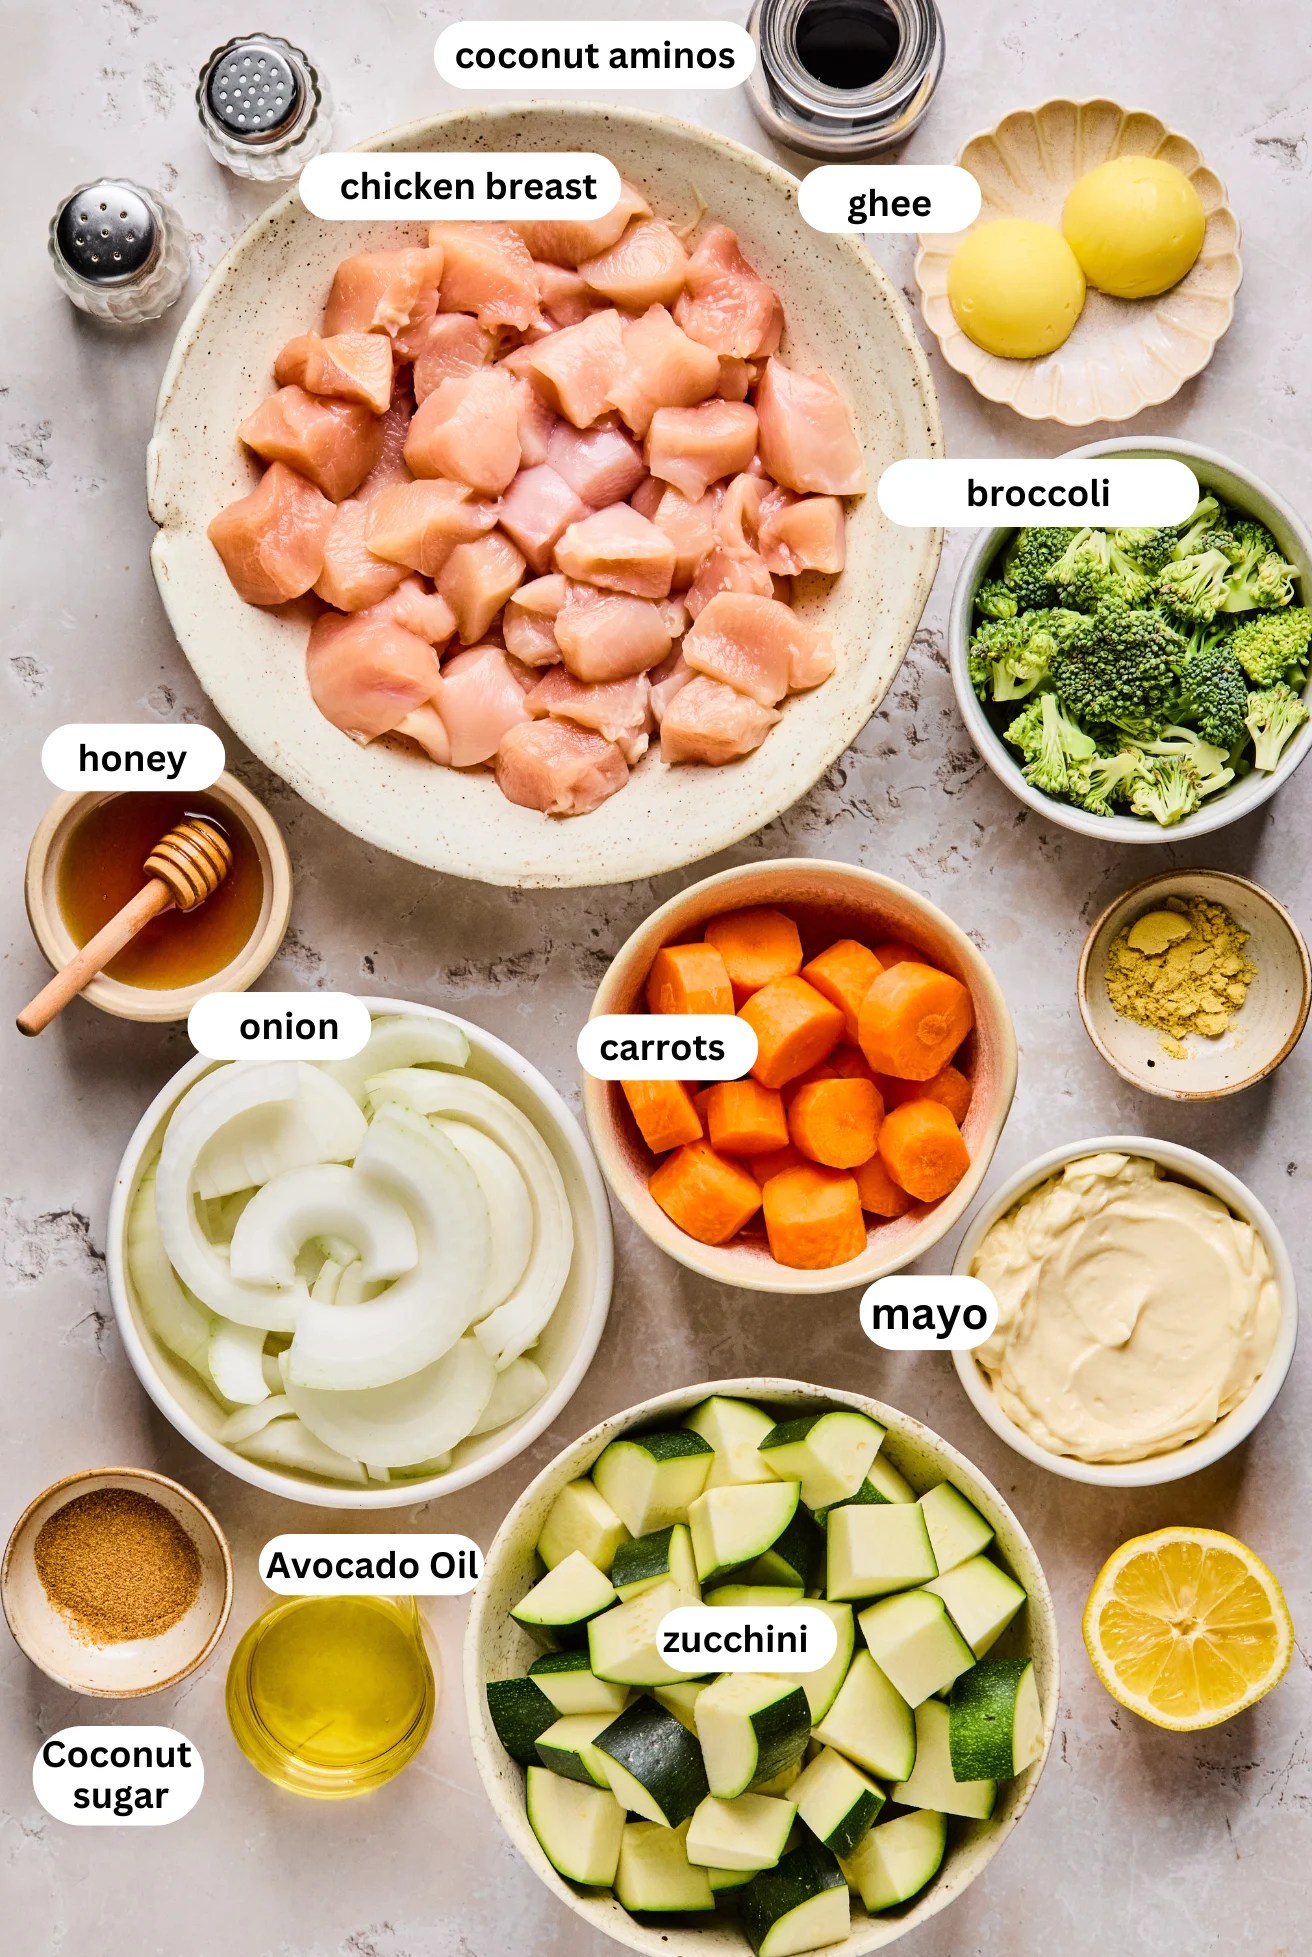
- Avocado oil & ghee. Most hibachi restaurants bring out those huge towers of what looks like butter or margarine, but for this recipe, we’ll use ghee which is clarified butter!
- Chicken breast.
- Yellow onion, carrots, zucchini, and broccoli. Part of the whole vibe of this recipe is slicing the vegetables the right way! You want to slice the onion into strips, and the zucchini into 1″ slices to go for the whole Hibachi feel.
- Mayo.
- Coconut aminos
- Ground mustard. This is dried, ground mustard powder.
- Honey.
- Garlic and ginger powder.
What seasoning do they use for hibachi?
For traditional hibachi, the seasonings are typically salt, pepper, garlic, onion, ginger, and sesame seeds.
What gives hibachi its signature flavor? Is there a secret ingredient?
Beyond the seasonings, a lot of the signature hibachi flavor also comes from butter, soy sauce, and lemon. However, in my opinion, the real secret ingredient to the process is the nature of the high heat cooking for the perfect sear and tender chicken without drying it out! You get a quick cook time and perfectly tender chicken every time with this method.
How to Make Homemade Hibachi Chicken
Here are the simple steps, with photos, to make this recipe. Find full instructions in the recipe card.

Step one. Heat the avocado oil in a large deep pan and add the vegetables. Saute to crisp and cover to steam.

Step two. Remove the lid and add the coconut aminos, ghee, coconut sugar and lemon juice. Set aside.

Step three. Add the chicken to the pan and cook through.

Step four. Add the coconut aminos, ghee, coconut sugar and lemon juice. Set aside.

Step four. Whisk the ingredients for the sauce together.

Step five. Serve the chicken, veggies and sauce!
Michelle’s Tips & Tricks 🤓
- Take a shortcut with pre-chopped vegetables. Many stores will sell stir-fry mix vegetables, or just broccoli florets on their own.
- Add more vegetables if desired. Mushrooms would also be wonderful in this recipe, as well as bell peppers.
- Add shrimp. You can for sure add shrimp! Be sure to cook the shrimp last as it cooks very quickly.
How to make Hibachi Chicken on the Blackstone Grill
I have a Blackstone grill in my yard, which is a flattop griddle that’s very similar to a Hibachi grill. This recipe is perfect for making on the blackstone!
This recipe is virtually the same on the blackstone, and it’s even faster. I like to make the veggies and fried rice simultaneously, then once those are done, I add the chicken to cook through and cook as directed.
Optional sides
- A side salad with Japanese Ginger Dressing
- Fried rice
- Hibachi ginger sauce (this is perfect for dipping!)
- Homemade Hibachi noodles
More Gluten Free Asian Inspired Recipes to Try

If you tried these Homemade Hibachi Chicken or any other recipe on my blog please leave a 🌟 star rating and let me know how it went in the 📝 comments below. Thanks for visiting!
Homemade Hibachi Chicken & Vegetables
Want to save this for later?
Just drop your name and email below. Then we’ll email right to your inbox. ✉️
Ingredients
For the hibachi chicken and vegetables
- 2 tbsp avocado oil
- 1 lb chicken breast, cubed
- 1 tsp sea salt, divided
- ¼ tsp black pepper, divided (omit for AIP)
- 2 tbsp ghee, divided (omit for AIP)
- 2 tsp garlic powder, divided
- 1 tsp ginger powder, divided
- ¼ cup coconut aminos, divided
- 2 tsp coconut sugar , omit for whole 30
- 1 tbsp lemon juice, divided
- 2 medium zucchinis, quartered and sliced into 1″ pieces
- 1 yellow onion, halved and sliced
- 2 carrots, sliced
- 1 cup broccoli florets
For the mustard sauce (omit for AIP)
- ½ cup mayo, I use a paleo mayo like sir kensingstons
- 2 tbsp coconut aminos
- 1 tbsp ground mustard, dried
- 1 tbsp honey, sub coconut sugar
- 1 tsp garlic powder
Instructions
- Using a large deep pan, heat the 1 tbsp of avocado oil over medium-high heat. Add the vegetables and Saute for 6-7 minutes or until the vegetables are lightly crisped. Cover and allow to steam on low for 2-3 minutes. Remove the lid and check the vegetables for tenderness. Add salt, pepper, 1 tsp garlic powder, 1 ts ginger powder, 1 tsp coconut sugar, 2 tbsp coconut aminos, 1 tbsp ghee, and half of the lemon juice lemon juice and stir to coat. Remove from the heat and set in a covered bowl to keep warm.
- Using a large deep pan, heat 1-2 tbsp of avocado oil over medium-high heat. Add the chicken and season with salt and pepper, turning often to cook on all sides until the internal temperature reaches 165 F. Add 2 tbsp of coconut aminos, 1 tbsp of ghee, 1 tsp ginger powder, 1 tsp of garlic powder, 1 tsp coconut sugar, and half of the lemon juice and stir the chicken to coat and season for another minute or so.
- Divide the chicken and vegetables among 4 plates and serve fresh with fried rice and the mustard sauce if desired (see below).
For the mustard sauce (omit for AIP)
- Stir all of the ingredients for the mustard sauce until well combined. Season further to taste and serve with the chicken.
Notes
Photos by Sierra Inn

THIS WAS DELICIOUS!! I’m literally in shock. The ingredients were so simple, yet everything is so delicious. Thank you for helping me eat good food on my weight loss journey
Made this tonight and it was excellent! Very reminiscent of a hibachi grill. I have a lot of food sensitivities and love that I can make something that tastes like food I used to enjoy. Hubby loved it too. Thank you for the recipe!
Thank you!!
My family loved this! Easy to make and tasted great.
Love this recipe! It’s on our rotation. The flavors are spot on and it’s simple and fast. Thank you!
So glad you enjoy it!!
I made the sauce with Thrive Coconut Oil mayo and it is sooo good! I have not made the main dish yet, because I was needing to know if that mayo was a keeper or not (first time using it) before I committed to the rest. So…guess what I’ll be making for dinner tomorrow? Excited! Very yummy sauce!
The sauce is so good! Hope you love the whole recipe!!
I was scrolling for Whole30 recipes and came across this! Super bummed that it’s actually not compliant, but will look forward to trying this once off Whole30. Thank you so much for your recipes! This is not compliant with this program (no added sugar of any kind). You may want to consider taking the Whole30 off the leading page unless you give an option for the sauce. I’m sure omitting the honey or coconut sugar would certainly change the yumminess of this recipe.
My husband and I thoroughly enjoyed the Hibachi Chicken with Vegetables and, especially, the Mustard Sauce. He told me three times during the meal how good it was and then thanked me for the yummy dinner afterward. So, I’d say that earned a 5-Star rating. Thank you, Michelle, for another winning recipe.
Oh my gosh this was soooo much better than any restaurant!! We doubled the veggies, added quartered mushrooms and served over green cabbage we cut into long strips then sautéed in a little sesame oil. Delicious!
Looks yummy!
We can’t have mustard. Is there something you think that I can sub for this?
Thank you!! You can either leave it out or add some ginger for some of that natural spice
One of my favorite recipes on here. My family and friends approve!
Made this today for myself and my son who has allergies, it was soooo good. My son actually commented (which he usually does not like anything new) , I stirred in rice pasta with the hibachi mixture, and he said it was really good. A win win ! Yay!
Just made this! Super tasty. Thanks so much!
This is amazing! So much better than in the restaurant too. My 4 year old approved of the chicken and vegetables. He was not a fan of the sauce. But that’s ok cause now I don’t have to share the sauce!
thank you!!