No-Knead Gluten Free Bread
This post contains affiliate links.
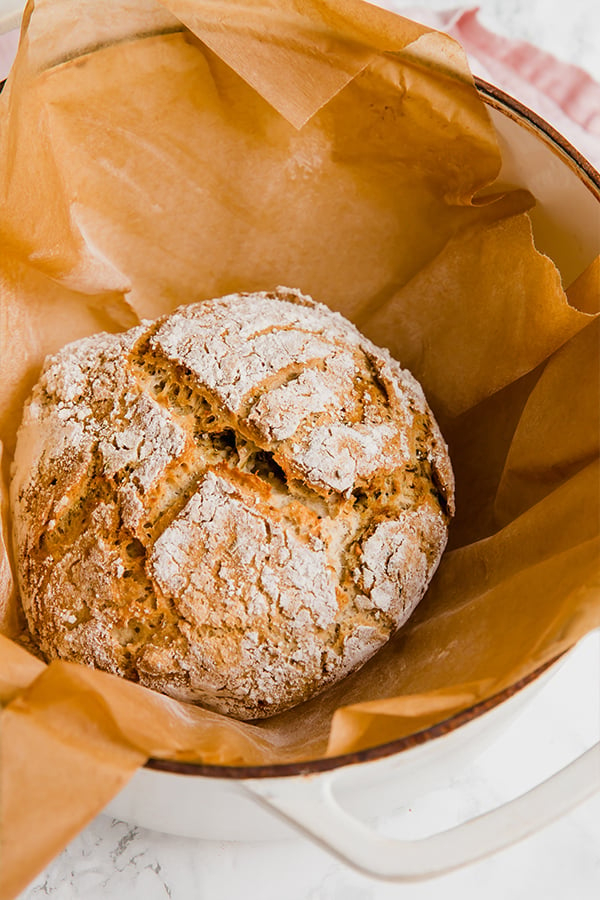
This no-knead gluten-free bread is an easy and delicious option for homemade bread! This rustic loaf is flavored with garlic & herb seasoning and olive oil.
No-Knead Gluten-Free Bread
Homemade bread is all the rage right now. Seriously, we’re all baking. I had aspirations to make gluten-free sourdough after taking a sourdough bread baking class this past summer here in Dallas, but after getting pregnant very soon after I got super distracted and it went on the back burner! But now, the urge is back, but I wanted something even easier than sourdough.
This no-knead gluten-free bread is perfect if you want fresh bread with minimal effort. This is a rustic style loaf that’s really easy to put together and flavored with garlic, herbs, and olive oil. This isn’t a paleo or AIP recipe, but it’s totally gluten-free and egg-free!
The Ingredients For This Recipe
- Gluten-free all-purpose flour (this is what I used. You can also try other cup for cup GF flours.)
- Active dry yeast (sadly, this is hard to find right now but I managed to get some delivered via Instacart from Natural Grocers!)
- Honey (swap other sugar alternatives for vegan.)
- Baking soda
- Apple cider vinegar
- Olive oil
- Garlic & herb seasoning (I use primal palate)
- Salt
The cookware you need for this recipe
Dutch oven pot (or a cast iron pot)
We learned about making bread in a dutch oven my sourdough class, and I loved it! I already have several and, seriously it makes amazing bread. The dutch oven gets the bread super hot and basically steams it just like an oven at a bakery would.
Any dutch oven will work, but I recommend using a bigger one so your bread has a bit more room to breathe.
Parchment paper
You definetly want to use parchment to keep the bread from sticking to the dutch oven and making it easier to transfer.
A cooling rack
I love using cooling racks to make sure baked goods cool appropriately. A cooling rack will help cool this bread down entirely so you get that perfect texture rather than a gummy loaf!
How to Make no Knead-Gluten Free Bread
- Prep the yeast: Add the yeast to a large bowl and pour the water over the yeast along with the honey. Cover the yeast mixture and allow to sit for 5-15 minutes.
- Prep the bread and allow to set: Add the remainder of the ingredients to the yeast mixture and stir with a rubber spatula to fully combine. Cover the bowl and allow to sit for 60 minutes.
- Preheat the oven: While the bread sits, preheat the oven to 450 F. Once heated, transfer a dutch oven/cast iron pot to the oven to allow to preheat.
- Form the bread: Set out a piece of parchment paper that’s lightly floured. Lightly flour your hands and scoop the bread dough out of the bowl and onto the parchment paper. Form the dough into a tight, round bread loaf.
- Bake: Very carefully remove the dutch oven from the oven and remove the lid. Transfer the bread dough along with the parchment paper to the dutch oven and cover. Place the covered dutch oven back in the oven and allow to bake for 35 min. Carefully remove the lid of the dutch oven and bake for another 15-20 minutes or until the bread is crisped to your liking.
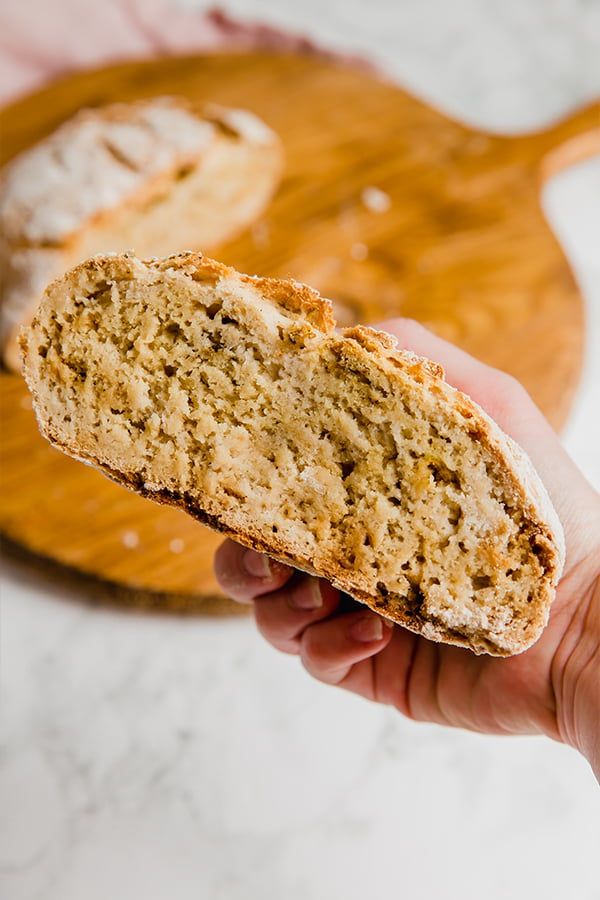
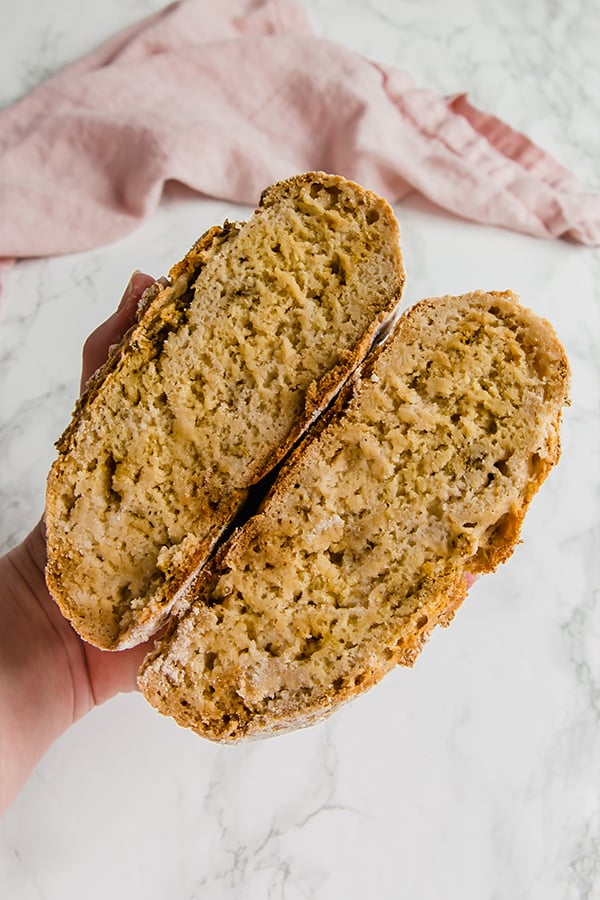
- Cool: Remove the bread from the oven and carefully transfer to a cooling rack. Allow to cool and come to room temperature (this will at least take one hour, but preferably two hours) before slicing and serving
Can you make this bread with other flours?
Flour is scarce right now, and since I’m super pregnant and not going to the store, I was a little limited on what I had on hand to test with. I have not tried other flours other than the one listed (here), but you likely could have similar results with other GF all-purpose flours.
Can you make this bread grain-free?
This bread is not grain-free. I haven’t tried, and the process may be very different. Personally, I would seek out a grain-free bread recipe instead of trying to modify this one for the best results!
“I don’t want to make my own bread… what’s your favorite gluten-free bread?”
By far, my favorite gluten-free bread is Bread Srsly GF sourdough bread! I’ve been eating it all the time during my pregnancy, and it’s incredibly delicious. They don’t sell it near me, but it ships fast and you can freeze leftovers. You can use the code UNBOUNDWELLNESS to get free shipping on your first order if you want to try it!
Tips & Tricks
Make sure the yeast is properly handled
The biggest mistake with activating yeast is using water that’s too hot. You want the temperature to be around 110F-120F, so make sure to use a kitchen thermometer!
Let the bread cool completely
Gluten-free bread can get gummy if it’s not cooled. Make sure it’s totally cooled before you slice into it. I’ve found the best way to do this is to leave in on a cooling rack for an hour at the minimum but two hours is better!
Season how you’d like
I think that gluten-free bread can be a little bland if you don’t flavor it, which is why this is a garlic & herb loaf! It really up-levels this bread to have a strong flavor like garlic and herb. However, you can mix up the seasonings if there’s something you prefer, like onion flakes, rosemary, etc!
You’ll also love…
No-Knead Gluten Free Bread
Want to save this for later?
Just drop your name and email below. Then we’ll email right to your inbox. ✉️
Ingredients
- 1 tsp active dry yeast
- 1 cup water, 110-120F
- 1 tsp honey
- 1 ½ cup gluten-free flour, I used this brand. Plus extra to flour hands
- ½ tsp baking soda
- 1 tsp apple cider vinegar
- 2 tbsp olive oil
- 2 tsp garlic and herb seasoning, I use this brand
- 1 tsp salt
Instructions
- Add the yeast to a large bowl and pour the water over the yeast along with the honey. Gently combine to disolve the yeast. Tightly cover the yeast mixture and allow to sit for 5-15 minutes. The top of the mixture should be foamy and bubbly.
- Add the remainder of the ingredients to the yeast mixture and stir with a rubber spatula to fully combine. Tightly cover the bowl and allow to sit for 45-60 minutes.
- While the bread sits, preheat the oven to 450 F. Once heated, transfer a dutch oven/cast iron pot to the oven to allow to preheat.
- Set out a piece of parchment paper that's lightly floured. Flour your hands and scoop the bread dough out of the bowl and onto the parchment paper. Add more flour as needed if the dough is wet to make it easier to work with. Form the dough into a tight, round bread loaf. Use a sharp knife to lightly score an cross into the top of the bread.
- Very carefully remove the dutch oven from the oven and remove the lid. Transfer the bread dough along with the parchment paper to the dutch oven and cover.
- Place the covered dutch oven back in the oven and allow to bake for 35 min.
- Carefully remove the lid of the dutch oven and bake for another 15-20 minutes or until the bread is crisped to your liking. (Be careful about the parchment paper burning)
- Remove the bread from the oven and carefully transfer to a cooling rack. Allow to cool completly and come to room temperature (this will at least take one hour, but preferably two hours) before slicing and serving.
- Serve toasted or untoasted with toppings of your choice! Store in the fridge.
Notes


Really liked this bread! Great instructions, too, thank you. Do you think I could make a cinnamon and raisin bread with this recipe (replace the garlic seasoning, of course). Best wishes on your birth and baby!
Hi, Kathy! Thank you so much, I’m so glad you liked it 🙂
Fabulous I don’t have a duch oven could I bake it in the oven please
Hi Jeanette! Yes, if you dont have a dutch oven you can use a pot or casserole dish with a tight fitting lid, or a deep baking sheet covered with aluminum foil to create a similar environment for baking the bread in.
3rd time making this bread – used flour mentioned in the recipe (first two I used Bob’s 1:1). It makes a difference – dough was not too sticky was easy to make a loaf. I doubt I will use any other flour for this recipe. This time I used cinnamon and added raisins. I haven’t eaten it but looks and smells good.
Replying to myself now that I’ve tasted it. Soooo good. Being gf I’ve missed cinnamon raisin bread this hits the spot!
Hi, can I use something different besides xantham gum for the bread?
I haven’t tried that myself, let me know if you find a good flour blend that works though!
my GF flour does not have xanthum gum in it, how much should I add?
I’m not sure, you would have to experiment, sorry!
Could or should I add zanthum gum to this recipe???? I have King Arthur’s 1 for 1 flour with no zanthum gum.
You likely would need to add it yes, but I haven’t tried myself!
My bread was hard as a rock, what went wrong
That does sound odd… did you use the same flour as the one linked or was it a different blend?
Thank you so very much.
I had a food panel and wheat, dairy and eggs were worst
I am NOT gluten intolerant or lactose intolerant.
Wheat IS
the culprit as is casein in dairy and eggs as high in sensitivity
I am trying very hard to make the transition (LOVE rustic breads)
I have managed to make it to oatmilk (am also sensitive to almonds)
Today was my last slice of wheat bread
I did find gluten free flour tortillas by Mission today
It thrilled me as I do love wraps
Now need to perhaps make my own mayo (have a recipe with cashews)
as Chosen avocado is whole eggs 🙁
You can get Namaste at VitaCost for $12.49
Quck delivery and have never failed in wonderful customer service
My apologies for rattling on, but this is a major deal for me but hope
it will make some impact
Hope you enjoy the recipe!!
Does this recipe work with instant dry yeast?
I haven’t tried it, but you should be able to use instant dry yeast and then you wouldn’t need to activate the yeast.
Hi can instant yeast be used in this recipe?
I’m actually pretty unfamiliar with instant yeast so I’m not entirely sure. Let me know if you try it!
Used bobs 1:1 it was wet but added more flour and it did work. Wondering if yeast that wasn’t so old would be better or is letting it sit where it’s warmer would be better? Saw someone comment about cold dough? I haven’t done enough gf baking to know… Any more tips?
Flavor was great! I want to make it every week now. So glad I invested in a Dutch oven.