No-Knead Gluten Free Bread
This post contains affiliate links.
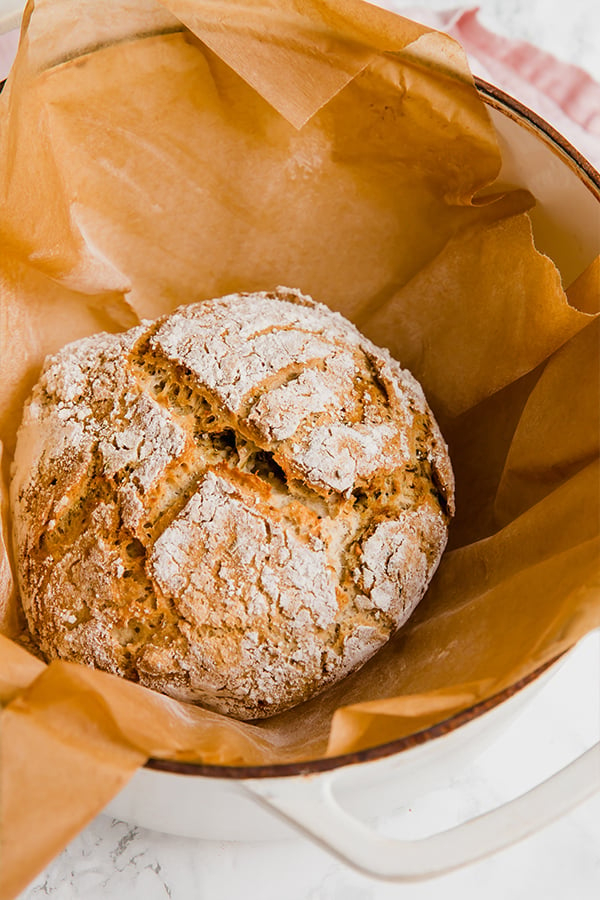
This no-knead gluten-free bread is an easy and delicious option for homemade bread! This rustic loaf is flavored with garlic & herb seasoning and olive oil.
No-Knead Gluten-Free Bread
Homemade bread is all the rage right now. Seriously, we’re all baking. I had aspirations to make gluten-free sourdough after taking a sourdough bread baking class this past summer here in Dallas, but after getting pregnant very soon after I got super distracted and it went on the back burner! But now, the urge is back, but I wanted something even easier than sourdough.
This no-knead gluten-free bread is perfect if you want fresh bread with minimal effort. This is a rustic style loaf that’s really easy to put together and flavored with garlic, herbs, and olive oil. This isn’t a paleo or AIP recipe, but it’s totally gluten-free and egg-free!
The Ingredients For This Recipe
- Gluten-free all-purpose flour (this is what I used. You can also try other cup for cup GF flours.)
- Active dry yeast (sadly, this is hard to find right now but I managed to get some delivered via Instacart from Natural Grocers!)
- Honey (swap other sugar alternatives for vegan.)
- Baking soda
- Apple cider vinegar
- Olive oil
- Garlic & herb seasoning (I use primal palate)
- Salt
The cookware you need for this recipe
Dutch oven pot (or a cast iron pot)
We learned about making bread in a dutch oven my sourdough class, and I loved it! I already have several and, seriously it makes amazing bread. The dutch oven gets the bread super hot and basically steams it just like an oven at a bakery would.
Any dutch oven will work, but I recommend using a bigger one so your bread has a bit more room to breathe.
Parchment paper
You definetly want to use parchment to keep the bread from sticking to the dutch oven and making it easier to transfer.
A cooling rack
I love using cooling racks to make sure baked goods cool appropriately. A cooling rack will help cool this bread down entirely so you get that perfect texture rather than a gummy loaf!
How to Make no Knead-Gluten Free Bread
- Prep the yeast: Add the yeast to a large bowl and pour the water over the yeast along with the honey. Cover the yeast mixture and allow to sit for 5-15 minutes.
- Prep the bread and allow to set: Add the remainder of the ingredients to the yeast mixture and stir with a rubber spatula to fully combine. Cover the bowl and allow to sit for 60 minutes.
- Preheat the oven: While the bread sits, preheat the oven to 450 F. Once heated, transfer a dutch oven/cast iron pot to the oven to allow to preheat.
- Form the bread: Set out a piece of parchment paper that’s lightly floured. Lightly flour your hands and scoop the bread dough out of the bowl and onto the parchment paper. Form the dough into a tight, round bread loaf.
- Bake: Very carefully remove the dutch oven from the oven and remove the lid. Transfer the bread dough along with the parchment paper to the dutch oven and cover. Place the covered dutch oven back in the oven and allow to bake for 35 min. Carefully remove the lid of the dutch oven and bake for another 15-20 minutes or until the bread is crisped to your liking.
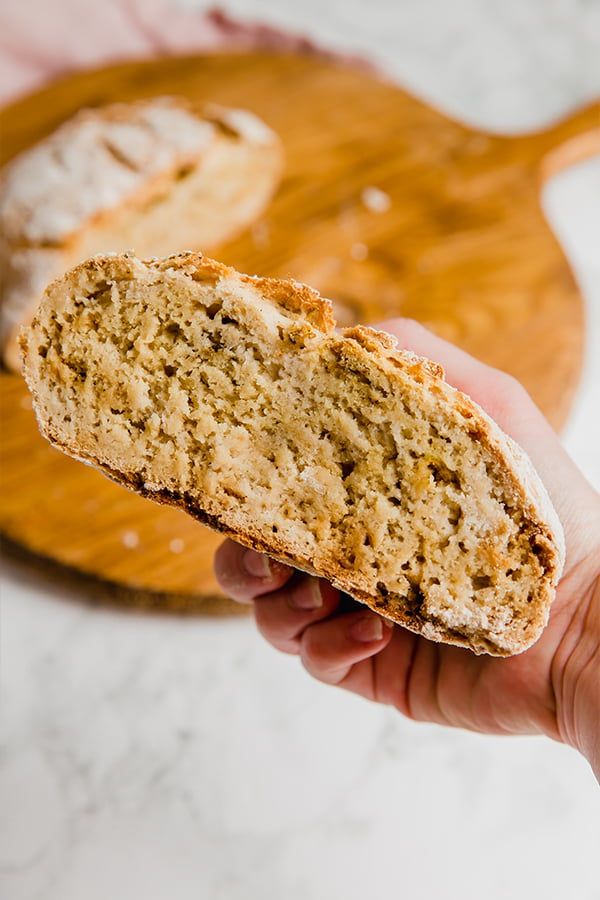
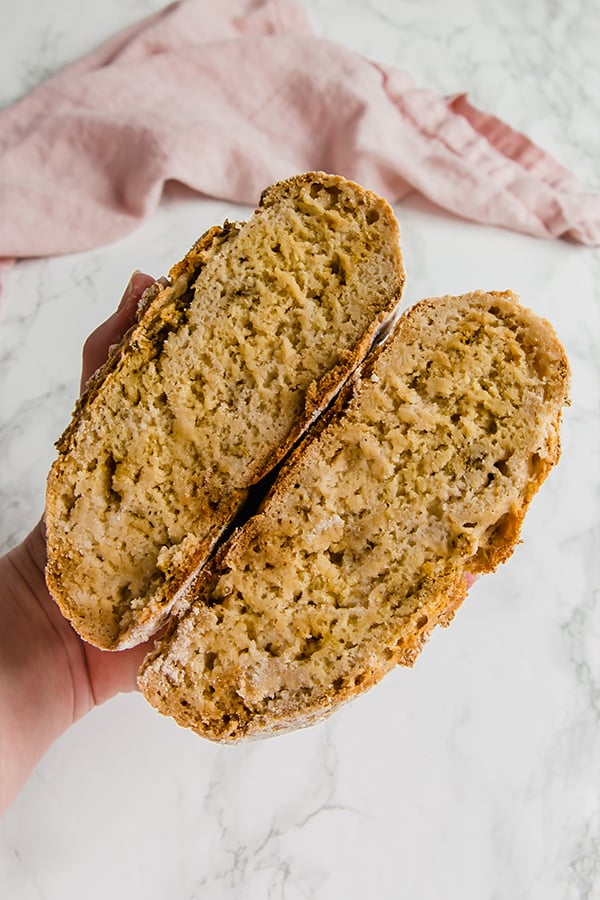
- Cool: Remove the bread from the oven and carefully transfer to a cooling rack. Allow to cool and come to room temperature (this will at least take one hour, but preferably two hours) before slicing and serving
Can you make this bread with other flours?
Flour is scarce right now, and since I’m super pregnant and not going to the store, I was a little limited on what I had on hand to test with. I have not tried other flours other than the one listed (here), but you likely could have similar results with other GF all-purpose flours.
Can you make this bread grain-free?
This bread is not grain-free. I haven’t tried, and the process may be very different. Personally, I would seek out a grain-free bread recipe instead of trying to modify this one for the best results!
“I don’t want to make my own bread… what’s your favorite gluten-free bread?”
By far, my favorite gluten-free bread is Bread Srsly GF sourdough bread! I’ve been eating it all the time during my pregnancy, and it’s incredibly delicious. They don’t sell it near me, but it ships fast and you can freeze leftovers. You can use the code UNBOUNDWELLNESS to get free shipping on your first order if you want to try it!
Tips & Tricks
Make sure the yeast is properly handled
The biggest mistake with activating yeast is using water that’s too hot. You want the temperature to be around 110F-120F, so make sure to use a kitchen thermometer!
Let the bread cool completely
Gluten-free bread can get gummy if it’s not cooled. Make sure it’s totally cooled before you slice into it. I’ve found the best way to do this is to leave in on a cooling rack for an hour at the minimum but two hours is better!
Season how you’d like
I think that gluten-free bread can be a little bland if you don’t flavor it, which is why this is a garlic & herb loaf! It really up-levels this bread to have a strong flavor like garlic and herb. However, you can mix up the seasonings if there’s something you prefer, like onion flakes, rosemary, etc!
You’ll also love…
No-Knead Gluten Free Bread
Want to save this for later?
Just drop your name and email below. Then we’ll email right to your inbox. ✉️
Ingredients
- 1 tsp active dry yeast
- 1 cup water, 110-120F
- 1 tsp honey
- 1 ½ cup gluten-free flour, I used this brand. Plus extra to flour hands
- ½ tsp baking soda
- 1 tsp apple cider vinegar
- 2 tbsp olive oil
- 2 tsp garlic and herb seasoning, I use this brand
- 1 tsp salt
Instructions
- Add the yeast to a large bowl and pour the water over the yeast along with the honey. Gently combine to disolve the yeast. Tightly cover the yeast mixture and allow to sit for 5-15 minutes. The top of the mixture should be foamy and bubbly.
- Add the remainder of the ingredients to the yeast mixture and stir with a rubber spatula to fully combine. Tightly cover the bowl and allow to sit for 45-60 minutes.
- While the bread sits, preheat the oven to 450 F. Once heated, transfer a dutch oven/cast iron pot to the oven to allow to preheat.
- Set out a piece of parchment paper that's lightly floured. Flour your hands and scoop the bread dough out of the bowl and onto the parchment paper. Add more flour as needed if the dough is wet to make it easier to work with. Form the dough into a tight, round bread loaf. Use a sharp knife to lightly score an cross into the top of the bread.
- Very carefully remove the dutch oven from the oven and remove the lid. Transfer the bread dough along with the parchment paper to the dutch oven and cover.
- Place the covered dutch oven back in the oven and allow to bake for 35 min.
- Carefully remove the lid of the dutch oven and bake for another 15-20 minutes or until the bread is crisped to your liking. (Be careful about the parchment paper burning)
- Remove the bread from the oven and carefully transfer to a cooling rack. Allow to cool completly and come to room temperature (this will at least take one hour, but preferably two hours) before slicing and serving.
- Serve toasted or untoasted with toppings of your choice! Store in the fridge.
Notes


This was a bit of a disaster. The bread was so watery when it was time to put it in the Dutch oven that I added another cup of flour and it still wouldn’t hold any shape. I poured it in and baked it but it was very flat and unappealing.
I’m sorry to hear this! Every brand of flour can yield different results. I recommend using the one I linked in the blog post.
can this be made with Instant yeast?
You probably can, but I haven’t tried it myself and I don’t have a ton of experience with it. But If you have experience with instant yeast I’m sure you can make it work.
I’m on my second attempt of the bread and it still seems to not be rising much. Maybe the pics are deceiving? I’m trying to gauge how big it actually is…great flavor though!! I want to keep trying till I get it right.
Gluten-free baking is tricky and doesn’t always rise as much as you might expect! If you are using a different flour blend then me, that could effect it and you may need to play with it to get it rigth.
I chose this for the gorgeous photos on Pinterest but it tastes even better than it looks! Love the addition of herbs and the bread is just so hearty and filling. As someone with celiac this makes me really happy!!
What size dutch oven should I use?
I believe I use around a 5 qt!
Thank you for sharing this recipe.
It is so nice to find a gluten free bread that exceeds your expectations.
One slice and I am back in the kitchen.
I am now adding ‘gluten free baker’ to my resume.
Love this recipe! Turned out great. Do you have any recommendation for how long to bake the bread if I doubled the recipe? It’s so yummy want to make a larger loaf. Thank you!
I beg to differ. I don’t know why you believe that flour is hard to find. There isn’t a shortage of flour.
There was a shortage of flour at the time when this blog post was written. It’s dated for 4/12/2020 when there were different demands on the market and grocery stores. Luckily, things have since changed!
I also had super wet, non forming dough after sitting for an hour. Chilling it to see how that works, as other gluten-free recipes recommend it before baking. Will also try more flour next time
I find this very runny and second making with different yeast. Had to add considerable extra flour and dry day. It did bake fine and the flavor is excellent! Should I reduce water 2nd time making and also how long would you bake for a double loaf?
What size Dutch oven? I want to purchase one but want to ensure I get the right size? Can’t wait to try this bread! P.S Jett is soooo cute!!
I believe I use around a 5 qt!
Oh my gosh. This bread is so good. Thank you so much for sharing the recipe. The family loved it and even my husband (who is not gluten free) asked for more. I can’t wait until you master gluten free sourdough bread so I can too 🙂
I hope your little family is doing well and that you and your husband are experiencing the joys of parenthood and your baby is thriving.
Thank you so much!!! So glad you liked it!!
The class was good for GF too? I saw they are going to do some online now and I’m interested! My bread is proofing now!
Making this right now and the dough is SUPER wet, way too wet to make a ball of dough with it. I added probably at least a half cup or more of the flour but it is just super wet. What am I doing wrong?
It is a fairly wet dough, so I add lots of flour to my hands to make sure that the dough is easier to handle! If that doesn’t work, it could be that the yeast wasn’t active enough?
The yeast was good. I’ll play with the flour and do it again. It definitely is worth trying again because it tastes like it will be a for sure winner once I figure it out! 😉 It reminded me of the bread appetizer at Macaroni Grill. Mmm! Cooling it completely definitely helps with the texture, so thanks for that tip. Do you actually get the dough to form into a ball? It was just mush in my hands.
Mine was really wet too. I just scraped it into the parchment and baked. I used bobs 1:1 and measured it on a scale. It was delicious and my husband requested it as rolls. I may get some English muffin molds, scrape dough in there and bake in the Dutch oven. May also do some without the garlic and use cinnamon & dates to make a sweet bread.
I really thought I commented the other day but it’s not here ♀️
Does your gf flour already have xanthan gum in it? Looks like Michelle’s flour she uses already has that mixed in. I wonder if that could be why. Check to see if your flour already has it added to it.
I don’t have a dutch oven, how can I bake it?
I’m not sure if it would bake correctly without a dutch oven… the dutch oven creates the steam that you would get from a high end bakery oven, so I don’t think that baking it on a baking sheet would have quite the same result. If you have any other cast iron with a lid, that should work!